Architect Scale Tape Measures and Rulers
The Powerful Architect Scale Ruler and Tape
The architect scale ruler and tape measure are used in construction and engineering. Your company logo will look great on these tapes when you give them to your clients or employees. Not only architects use an architect scale ruler and tape. Painting estimators, HVAC, electrical, structural steel, construction and carpentry estimators call them a daily necessity. We have a variety of styles and price ranges, to suit your individual needs.
The useful pocket tapes do the same thing as a ruler, except they are very portable. You won't even notice one is in your pocket.
-
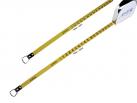 w906a Architects scale Lufkin tape
$22.75
w906a Architects scale Lufkin tape
$22.75Lufkin Architect tape with your company Logo.
-
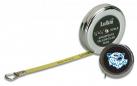 W393 Lufkin Architect Tape
$50.00
W393 Lufkin Architect Tape
$50.00NO LONGER AVAILABLE.
-
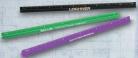
 Architect 6" Four Bevel Scales 3130
$8.95
Architect 6" Four Bevel Scales 3130
$8.95High quality rule with ultra smooth edges, 6" long.
-
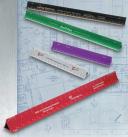
Engineer 12" Four Bevel Scales 3331
$12.95
High quality Engineer rule with ultra smooth edges, 12" long.
-
 Architect 6" Pocket Scale 3010
$7.25
Architect 6" Pocket Scale 3010
$7.25High quality 6" architect scale in a tube.
-
 Hollow Triangular Architect 12" Scale 3030
$10.95
Hollow Triangular Architect 12" Scale 3030
$10.95Durable, high quality 12" hollow triangular architect scale
How do you use an architect scale ruler?
To operate an architect scale ruler, first look at the Title Block on the blueprint. It is located in the bottom right corner. This area contains the following: title of the drawing, the owner or customer of the project, pertinent ID numbers, names of the designer, drawer, and the supervisors. It also has areas for the signatures of those who approved the drawing, and the dates they approved it. It has the page number, if multiple pages are involved, and the version number.
There is also a small block that says what scale the drawing was made in. Some examples are: 1" = 30', 1/4"=1', 1/8"=1', 1/2"=1'0". If it is 1/8=1', then use the side of the tape or ruler that is marked 1/8. This means that every mark is 1/8 inch apart. Every eighth inch equals one foot on the blueprint. If the blueprint says 1/4, then use the 1/4 side of the scale.
After you have determined which scale to use, you are ready for the next step. If your architect scale ruler's zero mark is not at the beginning of the markings, then you are able to get a more accurate measurement. Align the zero mark with the beginning of your object on the blueprint. Go to the end of your object and get the measurement, rounding it down. Then to get the rest of your measurement (the decimal part), slide the rounded down marking to the end of your object, and read the decimal part where the beginning of your object lines up with your scale. You're done!
Trivia: Why were blueprints always "blue" in the past?
In the days before Xerox copiers, the construction industry needed a way to produce multiple copies of large sheets of paper, without tracing the drawing by hand. In the mid-1800s, scientists discovered that if you mixed potassium ferrocyanide with ammonium iron citrate, a special solution was created. When exposed to bright light, it would "burn" itself into a sheet of paper. Without bright light, it would NOT "burn" into the paper. So if you would make a drawing on a translucent sheet of tracing paper, and place it over a saturated sheet of paper (the blueprint paper), a bright light would burn a negative image onto the blueprint paper. The lines that you drew would not allow the bright light to get through. When immediately washed with water, the result was an image of white lines, etc., on a blue background. The master that you made on the translucent sheet could be used many times again. Sounds messy, but it was an economical and accurate way to make copies.
Email your logo to us, and we can put it on the architect tape measures for you. This is a great way to advertise your company on a useful product.